How Can We Help?
使用 PortSIP PBX 在 Android 应用中实施推送通知
本指南详细指导您如何基于 PortSIP VoIP SDK 创建 Android 应用,且该应用能够接收从 PortSIP PBX 发出的 VoIP 通知。
1. VoIP 通知
官方文档可在此查看。其中优势包括:
- 如果接收到 VoIP 推送时应用未在运行,则应用会自动重新启动
- 仅当出现 VoIP 推送时才唤醒设备(节省电量)
- VoIP 推送会实时直接发送到您的应用,供您处理,不会产生延迟
- 收到 VoIP 推送时,如果应用未在运行,会自动重新启动
2. 先决条件设置
由于 PortSIP PBX 使用 Google Firebase 发送推送通知,我们需要配置部分设置,使其运行。
3. 创建 App ID
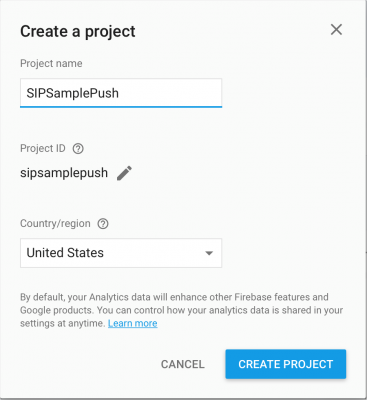
向 Firebase console 添加新应用。
您需要设置项目名称和国家或地区。例如,我可以将我的项目命名为 SIPSamplePush。
选择“向 Android 应用添加 Firebase”。
为您的应用设置数据包名称。由于我没有为应用认证使用 Firebase,我仅设置了数据包名,删去了 SHA-1。
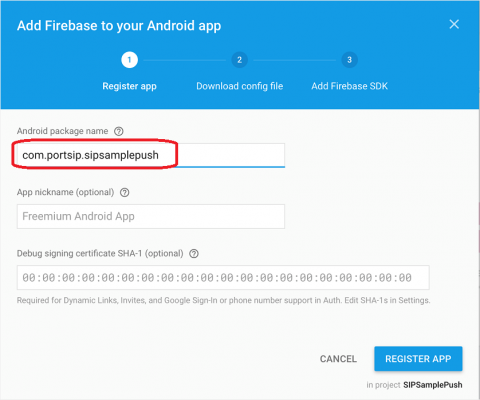
单击此处的 REGISTER APP 按钮,下载 google-services.json。这个文件非常重要,您需要将其放置到应用中。
重要提醒:请注意,Android 数据包名也即“App ID”,我们还会将其用于未来设置。
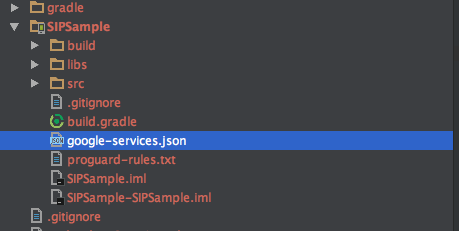
4. 将 google-services.json 添加至您的应用文件夹
现在请下载 PortSIP VoIP SDK Sample project ,并使用 Android Studio 将其打开 (PUSH SIPSample project)。
替换 SIPSample 文件夹中的 google-services.json。Gradle 版的 Google 服务插件会加载您下载的 google-services.json 文件。
5. 配置 Gradle 文件
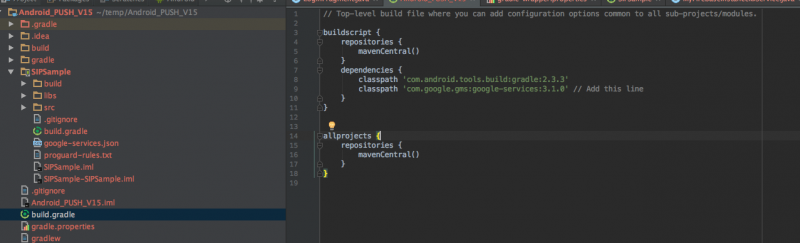
打开 Android Studio,修改 build.gradle 文件以使用 Google 服务插件。
(1) 更新项目级 build.gradle(项目文件夹中的文件)
将以下行的内容添加至 build.gradle 文件:
buildscript {
dependencies {
classpath 'com.google.gms:google-services:3.1.0' // Add this line
}
}
(2) 更新应用级 build.gradle(项目/SIPSample 中的文件)
a. 在 build.gradle 文件中添加下行内容:
apply plugin: 'com.google.gms.google-services'
b. 添加 Firebase 相关依赖关系:
在同一 build.gradle 文件下的依赖关系中添加 Firebase 相关依赖关系。
dependencies {
// this line must be included to integrate with Firebase
compile 'com.google.firebase:firebase-core:11.0.4'
// this line must be included to use FCM
compile 'com.google.firebase:firebase-messaging:11.0.4'
}
c. 使用 com.google.android.gms:play-services 更新使用的服务:
如果您将 Firebase 添加到使用任何 gms:play-services 功能(例如 GPS 位置)的现有项目中,则也必须更新其版本。在编写本教程时,11.0.4 运行正常。如果遇到编译问题,您需要检查以找出正确的版本号。
compile 'com.google.android.gms:play-services-auth:11.0.4'
compile 'com.google.android.gms:play-services-identity:11.0.4'
d. 将 applicationId 添加至 defaultConfig 代码段:
android {
defaultConfig {
applicationId "com.portsip.sipsamplepush" // this is the id that your app has
} }

6. 向应用添加服务
要使用 Firebase Cloud Messaging 服务,需要添加两个服务:基础代码,用于测试推送通知是否正常运行;其他代码,用于根据您的设计在应用中处理接收或发送消息。
添加可扩展 FirebaseMessagingService 的服务
要在应用中接收任何通知,您添加可扩展 FirebaseMessagingService 的服务,如下所示:
public class MyFirebaseMessagingService extends FirebaseMessagingService {
private static final String TAG = "FCM Service";
@Override
public void onMessageReceived(RemoteMessage remoteMessage) {
// TODO: Handle FCM messages here.
// If the application is in the foreground handle both data and notification messages here.
// Also if you intend on generating your own notifications as a result of a received FCM
// message, here is where that should be initiated.
Map<String, String> data = remoteMessage.getData();
String type=data.get("msg_type")//”audio” ”video” ”im”
String content = data.get("msg_content");
String from = data.get("send_from");
String to = data.get("send_to");
String xpushid = data.get("x-push-id");//new version (Portsip pbx>12.0)
String mimeType = data.get("mime_type");
}
@Override
public void onNewToken(String s) {
sendRegistrationToServer(s);
}
private void sendRegistrationToServer(String token) {
Intent intent = new Intent(this,MyService.class);
intent.setAction(MyService.ACTION_TOKENREFRESH );
intent.putExtra(MyService.DEVICE_TOKEN,token);
startService(intent);
}
}
将其添加至 AndroidManifest.xml 文件。
<service android:name=".MyFirebaseMessagingService">
<intent-filter>
<action android:name="com.google.firebase.MESSAGING_EVENT"/>
</intent-filter>
</service>
7. 测试和发送第一次推送通知
要确认设置是否成功,请运行一个测试,将测试消息发送给您自己的手机。
在 Firebase 控制台中,写下您的消息,然后选择一个应用。单击“发送消息”。
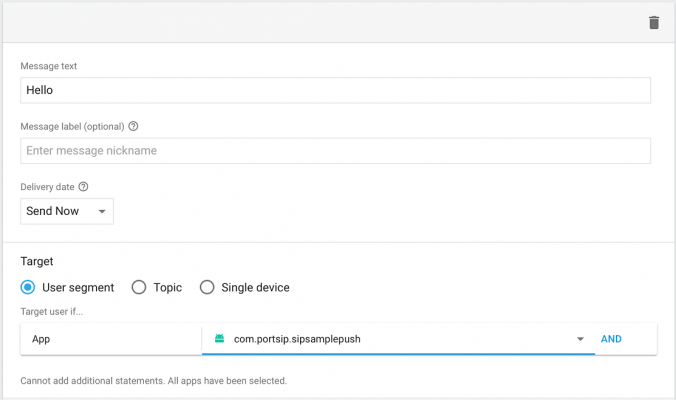
现在,您应该在您的 Android 手机上收到了推送通知。如果您的应用程序正在后台运行,您将在手机的通知中心获得通知; 否则将在 Android 监控日志中看到(我们必须输入一个代码来记录收到的消息)。
如果设置成功,您将在手机上收到一条通知。有时可能需要等待数分钟发送和接收到通知,因此请耐心等候。
8. 在应用中启用推送
向 REGISTER 消息添加 SIP 消息头“x-p-push”。我们将使用该消息告知 PortSIP PBX,该客户端已启用了推送通知。
import android.app.Service;
import android.content.Intent;
import android.text.TextUtils;
import android.util.Log;
import com.google.android.gms.tasks.OnCompleteListener;
import com.google.android.gms.tasks.Task;
import com.google.firebase.iid.FirebaseInstanceId;
import com.google.firebase.iid.InstanceIdResult;
import com.portsip.PortSipSdk;
import androidx.annotation.NonNull;
public class MyService extends Service implements OnPortSIPEvent
{
String pushToken = null ;
public static final String ACTION_TOKENREFRESH = "token_refresh";
public static final String DEVICE_TOKEN = "deviceToken";
public PortSipSdk mSipSdk;
String appid=”com.portsip.sipsamplepush”;//you app id
@Override
public void onCreate() {
...
//get device token
try {//
FirebaseInstanceId.getInstance().getInstanceId()
.addOnCompleteListener(new OnCompleteListener<InstanceIdResult>() {
@Override
public void onComplete(@NonNull Task<InstanceIdResult> task) {
if (!task.isSuccessful()) {
return;
}
pushToken =task.getResult().getToken();
}});
}catch (IllegalStateException e){
Log.d("",e.toString());
}
}
@Override
public int onStartCommand(Intent intent, int flags, int startId) {
if (intent != null && ACTION_TOKENREFRESH.equals(intent.getAction())) {
pushToken = intent.getStringExtra(DEVICE_TOKEN);
boolean supportPush = true;
setPushHeader(supportPush);
}
return START_REDELIVER_INTENT;
}
/**
* @param support true enable Push, false disable Push.
*/
private void setPushHeader(boolean support){
if(TextUtils.isEmpty(pushToken )){
String pushMessage = "device-os=android;device-uid=" + pushToken +";allow-call-push=”+support+”;allow-message-push=”+support+”;app-id=”+appid;
mSipSdk.addSipMessageHeader(-1,"REGISTER",1,"x-p-push",pushMessage);
if(sdk is online){
mSipSdk.refreshRegistration(0);
}
}
}
}
9. 可能出现的问题
- 由于 build.gradle 文件中的版本号码错误,可能出现变异错误。
- 如果您在 Android 监控日志中看到类似“com.google.firebase.crash.FirebaseCrash is not linked. Skipping initialization.”的消息,这是可以接受的,因为我们并未使用该 Firebase 崩溃分析服务。
- Firebase initialization is not starting
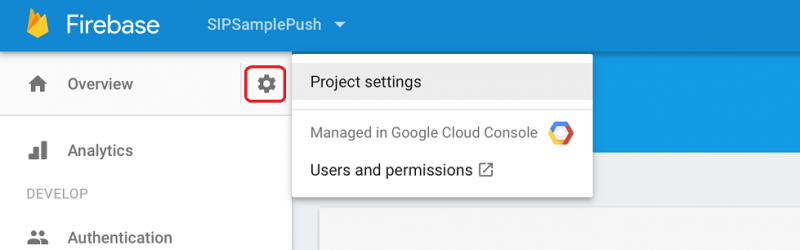
10. 获取服务器密钥和发送方 ID
(1) 在 Firebase 控制台,单击“设置”按钮,然后选择“项目设置”菜单。
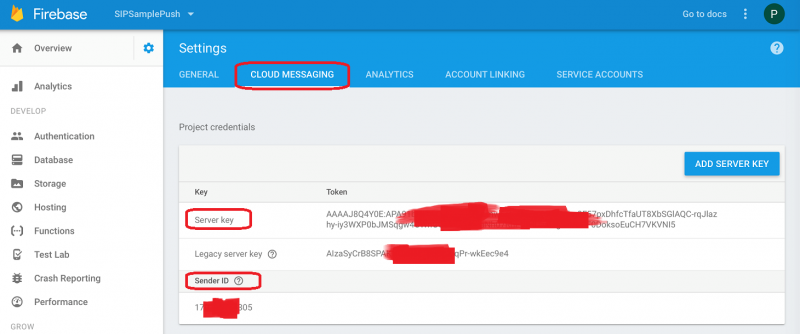
(2). 在“设置”页签,单击“云通信”页签,您可以看到“服务器密钥”和“发送方 ID”,请记下这些信息。
11. PortSIP PBX
现在登录至 PortSIP PBX 管理控制台,选择菜单“设置”>“移动推送”。
单击“添加新应用”按钮,您将看到以下屏幕:
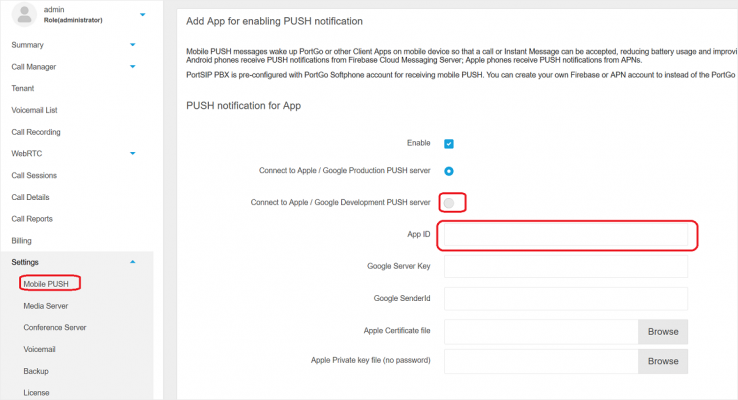
请设置以下项:
- 已启用 - 选中以启动推送,取消选中即禁用推送。
- Apple 和 Google 均提供了生产推送服务器和部署推送服务器,用于发送推送通知。开发生产服务器通常用于开发阶段。应用发布后,您可将其设置更改为生产服务器。
- App ID – 您在第 3 步中创建的 ID。注意:该 ID 区分大小写。
- Google 服务器密钥和 Google 发送方 ID – 您在第 2 步记录的密钥和 ID。
单击“应用”按钮,推送服务即在 PBX 中启用。