How Can We Help?
使用 PortSIP PBX 12.0 在本地 iOS 应用中实施推送通知
本指南详细指导您如何基于 PortSIP VoIP SDK 创建本地 iOS 应用,且该应用能够接收从 PortSIP PBX 12.0 发出的 VoIP 通知。
本手册支持最新的 PushKit 推送通知政策,该政策自 iOS 13 和 Xcode 11 开始实施。
从 iOS 13.0 开始,如果未向 CallKit 报告通话,系统会终止应用。多次未报告会导致系统不再向应用发送 VoIP 推送通知。如需在不使用 CallKit 的情况下发起 VoIP 通话,则需要使用 UserNotifications 框架替代 PushKit,用于注册 PUSH 通知。
PortPBX 12 利用 VoIP PUSH 推送 VoIP 呼叫,使用 PUSH 推送即时消息。
1. VoIP 通知
官方文档可在此查看。其中优势包括:
- 仅当出现 VoIP 推送时才唤醒设备(节省电量)
- 标准推送通知要求用户必须响应,然后应用才能执行某项操作;VoIP 推送则直接转到应用进行处理。
- VoIP 推送被视为最高优先级的通知,会立即发送,不会产生延迟。
- VoIP 推送包含的数据可多于标准推送通知提供的数据。
- 收到 VoIP 推送时,如果应用未在运行,会自动重新启动。
- 即使应用在后台运行,仍可以在运行时处理推送
2. 先决条件设置
Apple 提供了 PushKit 框架,可支持使用 VoIP 推送功能。但是,我们需要配置一些额外设置,以正常运行。
3. 创建应用 ID
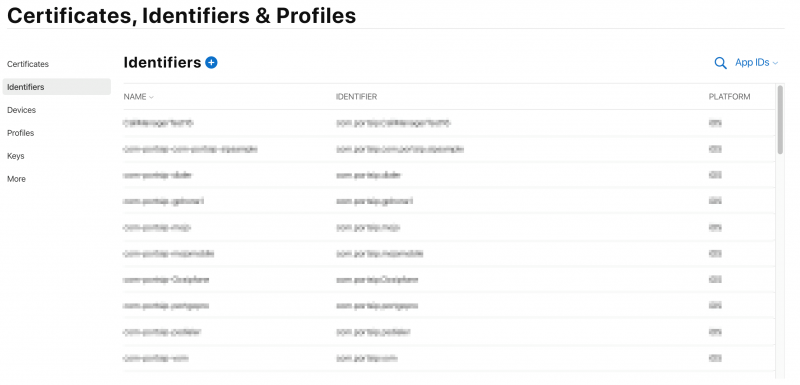
如果您没有应用(以及对应的应用 ID),您需要创建一个 ID。首先,登录至 Apple developer account,并访问证书、标识和资料:

接下来,转至标识,然后单击 + 按钮。
此处需要填写两处重要内容:应用 ID 描述和对应的资源包 ID(类似 com.yourdomain.yourappname):
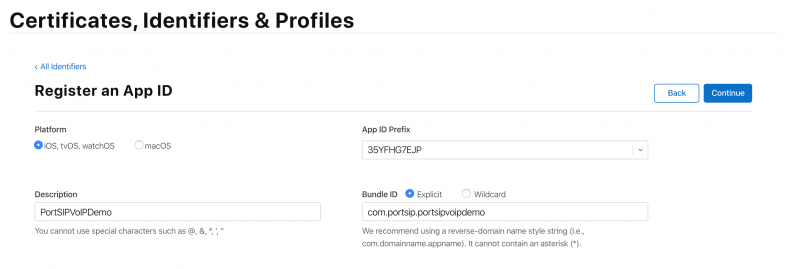
选择“推送通知”。

上方截图未显示,我使用了 com.portsip.portsipvoipdemo 作为资源包 ID。该选项在下一步非常重要。
4. 为 VoIP 通话生成 VoIP 推送证书
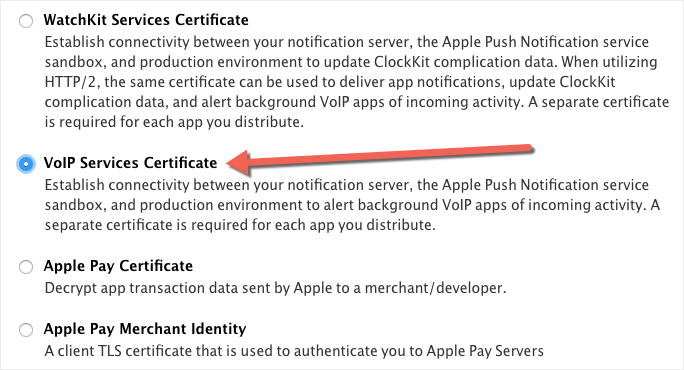
单击左边证书部分的全部按钮,然后单击 + 按钮:
在下一页,您需要选择 VoIP 服务证书:
然后,您需要选择为之创建此 VoIP 证书的应用 ID:
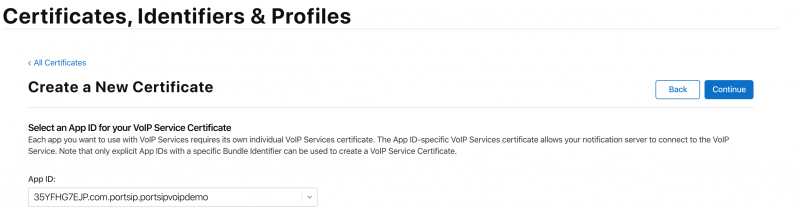
接下来,您将看到如何选择 CSR(证书签名请求)文件的指示信息:
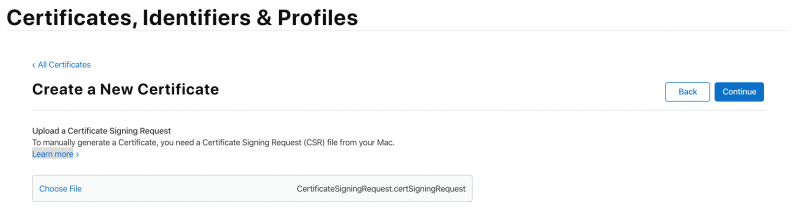
创建文件后,您需要在下一屏幕选择将其上传。如果操作顺利,您将获得需要下载的证书:
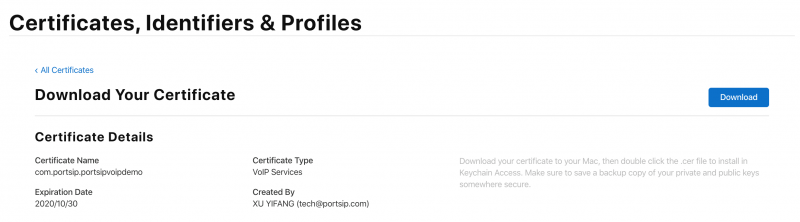
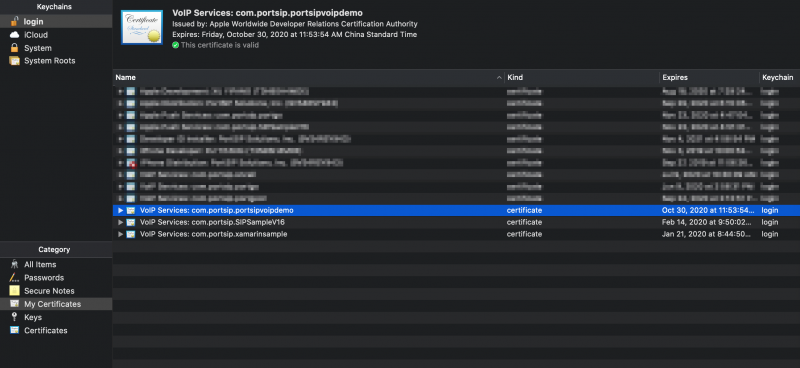
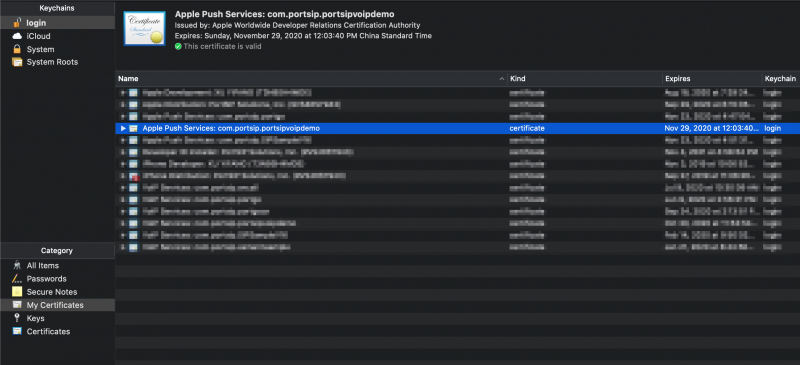
下载证书后,将其打开,Keychain Access 应用程序随即打开。现在您可在“我的证书”部分查看该证书:
5. 为即时通信生成 APNs 推送证书
单击左侧导航栏“证书”部分的“全部”按钮,然后单击 + 按钮:
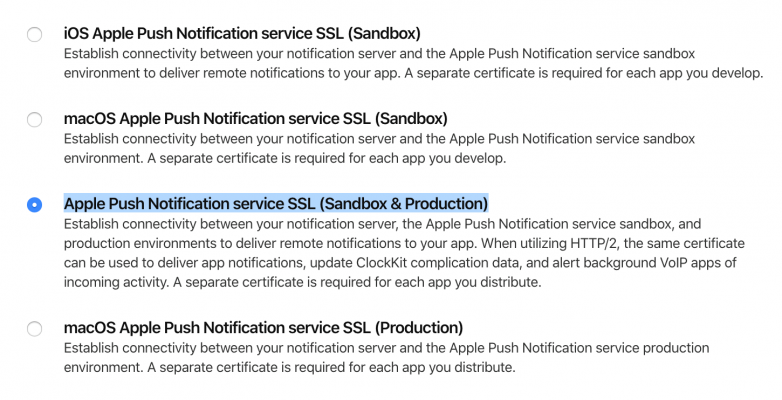
在接下来的页面,您需要选择 Apple 推送通知服务 SSL(沙箱和生产):
然后,选择要为其创建 Apple 推送通知的应用 ID:
接下来,您将看到如何选择 CSR(证书签名请求)文件的指示信息:
创建文件后,您需要在下一屏幕选择将其上传。如果操作顺利,您将获得需要下载的证书:
下载证书后,将其打开,Keychain Access 应用程序随即打开。现在您可在“我的证书”部分查看该证书:
6. 向 PortSIP SIPSample 项目添加 VoIP 推送支持
我们的最新版 SIPSample 已支持该功能,请从官网下载最新版 SIPSample。
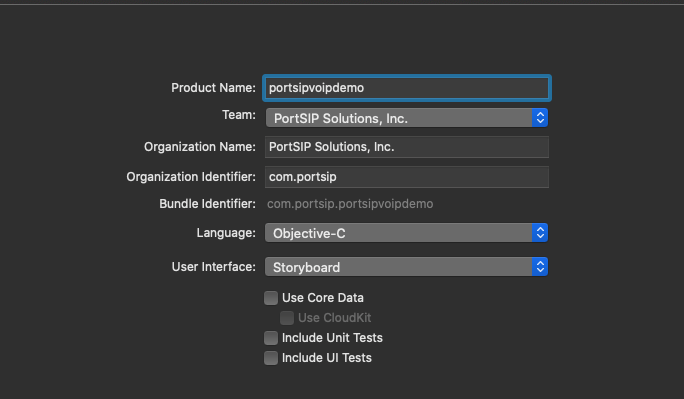
在设置产品名称时要特别小心,因为资源包标识符是自动根据它设置的。我们需要将其设置为在上面的步骤中设置的同一资源包标识符。
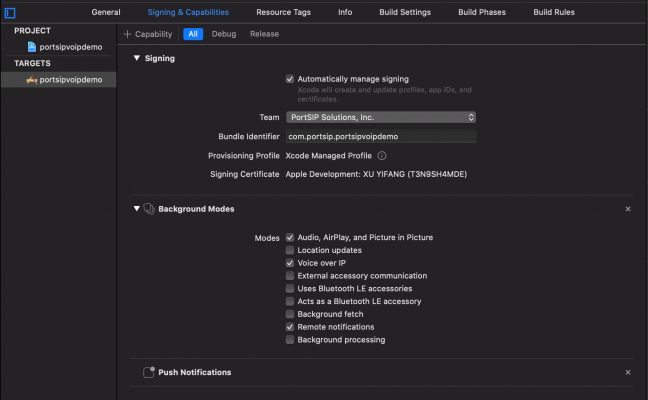
7. 设置对应功能
在项目的“签名和功能”选项卡,添加“推送通知”和“后台模式”。确保已启用“音频、AirPlay 和画中画”、“VoIP 技术”和“远程通知”选项。
8. 添加代码
打开 AppDelegate.m,在其顶部添加导入 PushKit 和 UserNotifications 语句。
#import <PushKit/PushKit.h>
#import <UserNotifications/UserNotifications.h>
@interface AppDelegate ()<PKPushRegistryDelegate,UNUserNotificationCenterDelegate>
@end
接下来,确保已在应用程序函数的 didFinishLaunchingWithOptions 部分注册了通知,如下所示:
- (BOOL)application:(UIApplication *)application didFinishLaunchingWithOptions:(NSDictionary *)launchOptions {
// Register VoIP PUSH
PKPushRegistry *pushRegistry = [[PKPushRegistry alloc] initWithQueue:nil];
pushRegistry.delegate = self;
pushRegistry.desiredPushTypes = [NSSet setWithObject:PKPushTypeVoIP];// Register APNs PUSH
if ([[[UIDevice currentDevice] systemVersion] floatValue] >= 10.0) {
// iOS > 10
UNUserNotificationCenter *center =
[UNUserNotificationCenter currentNotificationCenter];
center.delegate = self;
[center requestAuthorizationWithOptions:(UNAuthorizationOptionBadge |
UNAuthorizationOptionSound |
UNAuthorizationOptionAlert)
completionHandler:^(BOOL granted,
NSError *_Nullable error) {if (!error) {
NSLog(@"request User Notification succeeded!");
}
}];
} else { // iOS 8-10
if ([UIApplication instancesRespondToSelector:
@selector(registerUserNotificationSettings:)]) {
[[UIApplication sharedApplication]
registerUserNotificationSettings:
[UIUserNotificationSettings
settingsForTypes:UIUserNotificationTypeAlert |
UIUserNotificationTypeBadge |
UIUserNotificationTypeSound
categories:nil]];
}
}// Calling this will result in either
// application:didRegisterForRemoteNotificationsWithDeviceToken: or
// application:didFailToRegisterForRemoteNotificationsWithError: to be called
// on the application delegate.
[application registerForRemoteNotifications];
return YES;
}
我们需要为其实施委托回调函数 didRegisterUserNotificationSettings:
- (void)application:(UIApplication *)application didRegisterUserNotificationSettings:(UIUserNotificationSettings *)notificationSettings
{
PKPushRegistry *pushRegistry = [[PKPushRegistry alloc] initWithQueue:nil];
pushRegistry.delegate = self;
pushRegistry.desiredPushTypes = [NSSet setWithObject:PKPushTypeVoIP];
}
此时,您会从 pushRegistry.delegate = self; 收到一个错误,告知无法为类型“PKPushRegistryDelegate!”指定类型值“AppDelegate”。
pushRegistry 的委托函数类型为 PKPushRegistryDelegate,共有三种方法,其中两种方法是必须的。(didUpdatePushCredentials 和 didReceiveIncomingPushWithPayload)。我们需要定义一个类别为 AppDelegate 的分机,需要通过将以下代码添加至 AppDelegate.m 文件现有代码后:
APNs methods:
#pragma mark - APNs message PUSH
- (NSString *)stringFromDeviceToken:(NSData *)deviceToken {
if ([[[UIDevice currentDevice] systemVersion] floatValue] >= 13.0) {
NSUInteger length = deviceToken.length;
if (length == 0) {
return nil;
}
const unsigned char *buffer = deviceToken.bytes;
NSMutableString *hexString =
[NSMutableString stringWithCapacity:(length * 2)];
for (int i = 0; i < length; ++i) {
[hexString appendFormat:@"%02x", buffer[i]];
}
return [hexString copy];
} else {
NSString *token = [NSString stringWithFormat:@"%@", deviceToken];token =
[token stringByTrimmingCharactersInSet:
[NSCharacterSet characterSetWithCharactersInString:@"<>"]];return [token stringByReplacingOccurrencesOfString:@" " withString:@""];
}
}- (void)application:(UIApplication *)application
didRegisterForRemoteNotificationsWithDeviceToken:(NSData *)deviceToken {_APNsPushToken = [self stringFromDeviceToken:deviceToken];
NSLog(@"_APNsPushToken :%@", deviceToken);
[self refreshPushStatusToSipServer:YES];
}
// 8.0 < iOS version < 10.0
- (void)application:(UIApplication *)application
didReceiveRemoteNotification:(NSDictionary *)userInfo
fetchCompletionHandler:
(void (^)(UIBackgroundFetchResult))completionHandler {NSLog(@"didReceiveRemoteNotification %@", userInfo);
completionHandler(UIBackgroundFetchResultNewData);
}// iOS version > 10.0 Background
- (void)userNotificationCenter:(UNUserNotificationCenter *)center
didReceiveNotificationResponse:(nonnull UNNotificationResponse *)response
withCompletionHandler:(nonnull void (^)(void))completionHandler {NSDictionary *userInfo = response.notification.request.content.userInfo;
NSLog(@"Background Notification:%@", userInfo);completionHandler();
}// iOS version > 10.0 foreground
- (void)userNotificationCenter:(UNUserNotificationCenter *)center
willPresentNotification:(UNNotification *)notification
withCompletionHandler:
(void (^)(UNNotificationPresentationOptions))completionHandler {NSDictionary *userInfo = notification.request.content.userInfo;
NSLog(@"Foreground Notification:%@", userInfo);completionHandler(UNNotificationPresentationOptionBadge);
}VoIP PUSH methods:
- (void)pushRegistry:(PKPushRegistry *)registry
didUpdatePushCredentials:(PKPushCredentials *)credentials
forType:(PKPushType)type {
_VoIPPushToken = [self stringFromDeviceToken:credentials.token];NSLog(@"didUpdatePushCredentials:%@", _VoIPPushToken);
[self refreshPushStatusToSipServer:YES];
}// iOS version > 11.0
-(void)pushRegistry:(PKPushRegistry *)registry
didReceiveIncomingPushWithPayload:(PKPushPayload *)payload
forType:(PKPushType)type
withCompletionHandler:(void (^)(void))completion {
[self processPushMessageFromPortPBX:payload.dictionaryPayloadwithCompletionHandler:completion];
}
// 8.0 < iOS version < 11.0
(void)pushRegistry:(PKPushRegistry *)registry
didReceiveIncomingPushWithPayload:(PKPushPayload *)payload
forType:(PKPushType)type {
[self processPushMessageFromPortPBX:payload.dictionaryPayload
withCompletionHandler:nil];
}
添加此分机后,您会注意到先前提及的错误已消失。
在第一个函数中,我们仅需输出设备令牌。接下来部分中通过发送 VoIP 推送通知测试应用时需要使用该令牌。
在第二个函数,我们“采取行动”收到 VoIP 推送通知。自 iOS 13.0 起,我们必须向 CallKit 报告每一个呼叫。第三个函数 (didInvalidatePushTokenForType) 处于处理令牌失效时的状况。
我们需要告知 PortSIP,客户端已通过向 REGISTER 消息添加 SIP 消息头“x-p-push”启用推送。
- (void)addPushSupportWithPortPBX:(BOOL)enablePush {
if (_VoIPPushToken == nil || _APNsPushToken == nil ||
!_enablePushNotification)
return;// This VoIP Push is only work with
// PortPBX(https://www.portsip.com/portsip-pbx/)
// if you want work with other PBX, please contact your PBX Provider
NSString *bundleIdentifier = [[NSBundle mainBundle] bundleIdentifier];
[portSIPSDK clearAddedSipMessageHeaders];
NSString *pushMessage;
NSString *token = [[NSString alloc]
initWithFormat:@"%@|%@", _VoIPPushToken, _APNsPushToken];
if (enablePush) {
pushMessage = [[NSString alloc]
initWithFormat:@"device-os=ios;device-uid=%@;allow-call-push=true;"
@"allow-message-push=true;app-id=%@",
token, bundleIdentifier];NSLog(@"Enable pushMessage:{%@}", pushMessage);
} else {
pushMessage = [[NSString alloc]
initWithFormat:@"device-os=ios;device-uid=%@;allow-call-push=false;"
@"allow-message-push=false;app-id=%@",
token, bundleIdentifier];
NSLog(@"Disable pushMessage:{%@}", pushMessage);
}[portSIPSDK addSipMessageHeader:-1
methodName:@"REGISTER"
msgType:1
headerName:@"x-p-push"
headerValue:pushMessage];
}
应用收到推送或应用正在运行时,会自动注册到服务器:
- (void)doAutoRegister
{
if([_textUsername.text length] > 1 &&
[_textPassword.text length] > 1 &&
[_textSIPserver.text length] > 1 &&
[_textSIPPort.text length] > 1 &&
[_textToken.text length] > 1){
[self onLine];
}
}
9. 准备证书文件
我们下载并添加至 KeyChain 的 VoIP 证书文件已转换为其他文件格式,因此我们无法使用我上面所述的工具和服务将其打开。
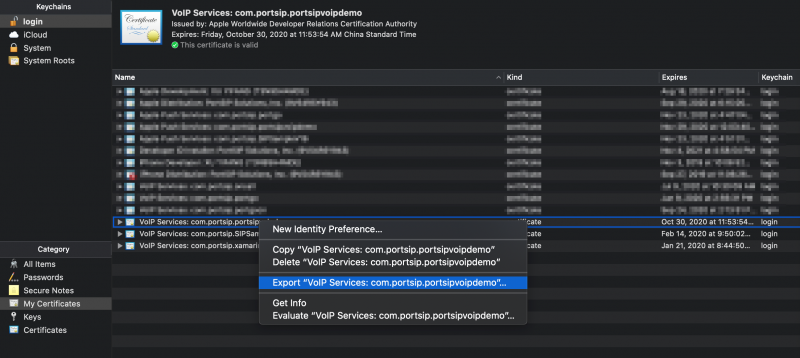
首先,您需要在 Mac 上打开 KeyChain 应用,并导出 VoIP 服务证书(右键单击,然后选择“导出”):
您将获得一个 YOUR_CERT.p12(例如 pvoip_push.p12)文件。现在导出该证书密钥文件。
现在,浏览到您将该文件到处置的文件夹,并执行以下命令:
使用 VoIP 服务证书创建推送凭证:
$> openssl pkcs12 -in voip_push.p12 -nocerts -out voip_push_key.pem
Enter Import Password: (Enter the password when you export form Keychain)
MAC verified OK
Enter PEM pass phrase: (Must Enter the password, e.g:1234)
Verifying - Enter PEM pass phrase: (Must Enter the above password, e.g:1234)
$> openssl rsa -in voip_push_key.pem -out voip_push_key_nopws.pem
Enter pass phrase for voip_push_key.pem: (Must Enter the above password, e.g:1234)$> openssl pkcs12 -in voip_push.p12 -clcerts -nokeys -out voip_push.pem
使用 Apple 推送服务证书创建推送凭证:
$> openssl pkcs12 -in apns_push.p12 -nocerts -out apns_push_key.pem
Enter Import Password: (Enter the password when you export form Keychain, empty is allowed)
MAC verified OK
Enter PEM pass phrase: (Must Enter the password, e.g:1234)
Verifying - Enter PEM pass phrase: (Must Enter the above password, e.g:1234)$> openssl rsa -in apns_push_key.pem -out apns_push_key_nopws.pem
Enter pass phrase for apns_push_key.pem: (Must Enter the above password, e.g:1234)
$> openssl pkcs12 -in apns_push.p12 -clcerts -nokeys -out apns_push.pem
我们需要将两个推送凭证合并为一个文件:
$> cat voip_push.pem apns_push.pem > portpbx_push.pem
$> cat voip_push_key_nopws.pem apns_push_key_nopws.pem > portpbx_push_key.pem
该操作将生成 portpbx_push.pem 和 portpbx_push_key.pem 文件,我们后续将在 PBX 服务器中使用。
10. Houston
Houston 让我们能够从终端窗口发送推送通知以进行测试。
我们下载并添加至 KeyChain 的 VoIP 证书文件已转换为其他文件格式,因此我们无法使用我上面所述的工具和服务将其打开。尽管文档提示说您只需通过 gem 即可安装 Houston,您最终(在进行一些 StackOverflow 搜索后)可能还是需要使用命令进行安装:
sudo gem install -n /usr/local/bin houston
通过该方法,您可以将其安装至您具有完整权限的本地 bin 目录。
Houston 安装了另一个工具,可帮助我们通过以下方式发送通知:
通过终端浏览至您的证书储存的文件夹:
测试 APNs PUSH:
$> openssl pkcs12 -in apns_push.p12 -out apnspush_onlyone.pem -nodes -clcerts
从 APP didUpdatePushCredentials 复制设备令牌,然后执行以下命令:
apn push "<40cc4209 d0f3ac25 95a7e937 3282897b 211231ef ba66764c 6fd2befa b42076cb>" -c portgo2in1.pem -m "Testing VoIP notifications!"
您将在终端收到以下输出:
1 push notification sent successfully
如果该应用正在前端运行,您将在手机中看到一条 APP didReceiveIncomingPushWithPayload 推送信息。
如果您偏好 UI 方式,可下载 Apple 推送通知服务 (APNs) 调试应用程序 Knuff。
11. PortSIP PBX
现在,登录至 PortSIP PBX 12.0 管理控制台,选择菜单“设置”>“移动推送消息”。
单击“添加新应用”按钮,然后您可看到以下屏幕:
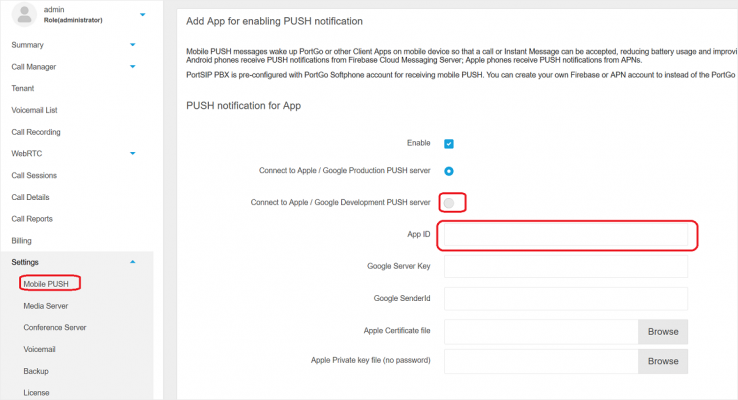
请设置以下项:
- 已启用 - 选中以启动推送,取消选中即禁用推送。
- Apple 和 Google 均提供了生产推送服务器和部署推送服务器,用于发送推送通知。开发生产服务器通常用于开发阶段。应用发布后,您可将其设置更改为生产服务器。
- App ID – 您在第 3 步中创建的 ID。注意:该 ID 区分大小写。
- Apple 证书文件和密钥文件,即您在第 9 步生成的证书文件。请谨记,密钥文件必须无密码(portpbx_push.pem 和 portpbx_push_key.pem)。
单击“应用”按钮,推送服务即在 PBX 中启用。